Stop wasting money on acoustic foam to block your neighbor’s noise. The solution to apartment sound problems isn’t absorption, but understanding the physics of your building’s structure.
- Soundproofing is a structural battle against vibration, using Mass and Decoupling to physically stop sound from entering or leaving your space.
- Acoustic Treatment is about managing airborne sound energy within your room, using Absorption and Diffusion to achieve clarity and accurate audio.
Recommendation: Diagnose your problem first. If you want to block external noise, you need soundproofing. If you want to improve the sound quality inside your room, you need acoustic treatment.
There is a fundamental misunderstanding that costs tenants and home studio creators a fortune: the confusion between soundproofing and acoustic treatment. You’re frustrated by the traffic noise outside or your neighbor’s TV, so you cover your walls in egg cartons or cheap foam panels, only to find the problem persists. You invest in expensive studio monitors, but your mixes sound muddy everywhere except your room. The issue isn’t your gear or your effort; it’s a misdiagnosis of the problem. You’re treating a broken bone with a bandage.
Most advice online boils it down to a simple platitude: « soundproofing blocks sound, and acoustic treatment makes it sound better. » While true, this statement completely ignores the architectural and physical realities of an apartment building. Effective sound control isn’t about applying products to surfaces; it’s about adopting a structural mindset. Sound is a physical force. Low-frequency noise from a passing truck is a vibration that travels through the concrete and studs of your building, while the reflections from your voice are airborne energy bouncing around your room.
The key to solving your noise issues lies in correctly identifying whether you are fighting a battle of isolation (soundproofing) or a battle of clarity (acoustic treatment). They are two separate disciplines that require entirely different tools and strategies. Treating one with the solution for the other is a guaranteed path to frustration and wasted money. This is especially true for tenants, who must find effective, non-permanent solutions that respect their lease agreement.
This guide will deconstruct these two concepts from an architectural perspective. We will first build a virtual fortress, exploring the non-negotiable principles of soundproofing—mass, decoupling, and sealing—to achieve true isolation. Then, we will furnish that fortress for sonic accuracy, diving into the science of acoustic treatment to tame reflections and create a reliable listening environment.
Table of Contents: A Structural Guide to Apartment Acoustics
- Why Adding Mass is the Only Way to Stop Traffic Noise?
- Clips or Channels: How to Decouple Drywall for Maximum Isolation?
- Glass or Plexiglass: How to Seal Windows Without Losing Light?
- The Air Gap Error That Renders Your Soundproofing Useless
- Problem & Solution: Silencing Air Conditioning Rumble in the Booth
- Egg Cartons vs Rockwool: The Acoustic Treatment Myth That Won’t Die
- Problem & Solution: Achieving Pro Quality in an Untreated Bedroom
- Why Your Mixes Translate Poorly Even With Expensive Monitors?
Why Adding Mass is the Only Way to Stop Traffic Noise?
To understand soundproofing, you must first think of sound not as an abstract noise, but as physical energy. Low-frequency sound waves from traffic, construction, or a neighbor’s bass-heavy music are powerful and long. They cause the physical structure of your walls to vibrate, transferring that energy directly into your room. The only way to stop this transfer is to put an obstacle in the way that is too heavy and dense to be moved by the sound energy. This is the principle of Mass. A flimsy wall is easily vibrated; a thick, heavy wall is not.
This is why lightweight materials like foam or blankets do virtually nothing to block low-frequency noise. They lack the density to impede the sound waves. The gold standard for adding mass in a non-permanent way is Mass Loaded Vinyl (MLV). This is a heavy, flexible, vinyl sheet impregnated with metal particles, designed specifically to add significant weight to a wall or structure without adding much thickness. Industry data shows that MLV can reduce noise by 26 to 30 dB, a reduction that can turn an intrusive rumble into a background murmur. For tenants, MLV can be incorporated into DIY solutions like heavy curtains or removable panels.
For dealing with traffic noise in an apartment, a layered approach based on your budget and lease constraints is most effective:
- Good: Seal air gaps around your existing windows with acoustic sealant and weatherstripping. This is the lowest-cost solution and addresses the primary weakness where airborne sound enters.
- Better: Install heavy, floor-to-ceiling curtains that incorporate a dense core of MLV. This adds significant mass without any permanent modifications to the building structure.
- Best: Construct a DIY removable window plug. Using layers of MDF or drywall with an insulating core creates a sealed « Mass-Air-Mass » barrier that provides the maximum possible noise reduction for a window opening.
Clips or Channels: How to Decouple Drywall for Maximum Isolation?
While mass is effective against airborne sound, it’s often not enough to combat structure-borne vibrations. Sound energy doesn’t just travel through the air and hit your wall; it travels through the solid materials of the building itself—the floor joists, concrete slab, and wall studs. These connections act as a super-highway for vibrations. This phenomenon is known as a flanking path, where sound bypasses your soundproofed wall by traveling around it through the shared structure.
This paragraph introduces a complex concept. To understand it, it’s useful to visualize its components. The illustration below breaks down this process, showing how sound waves can bypass a wall by traveling through the shared floor and ceiling structure.
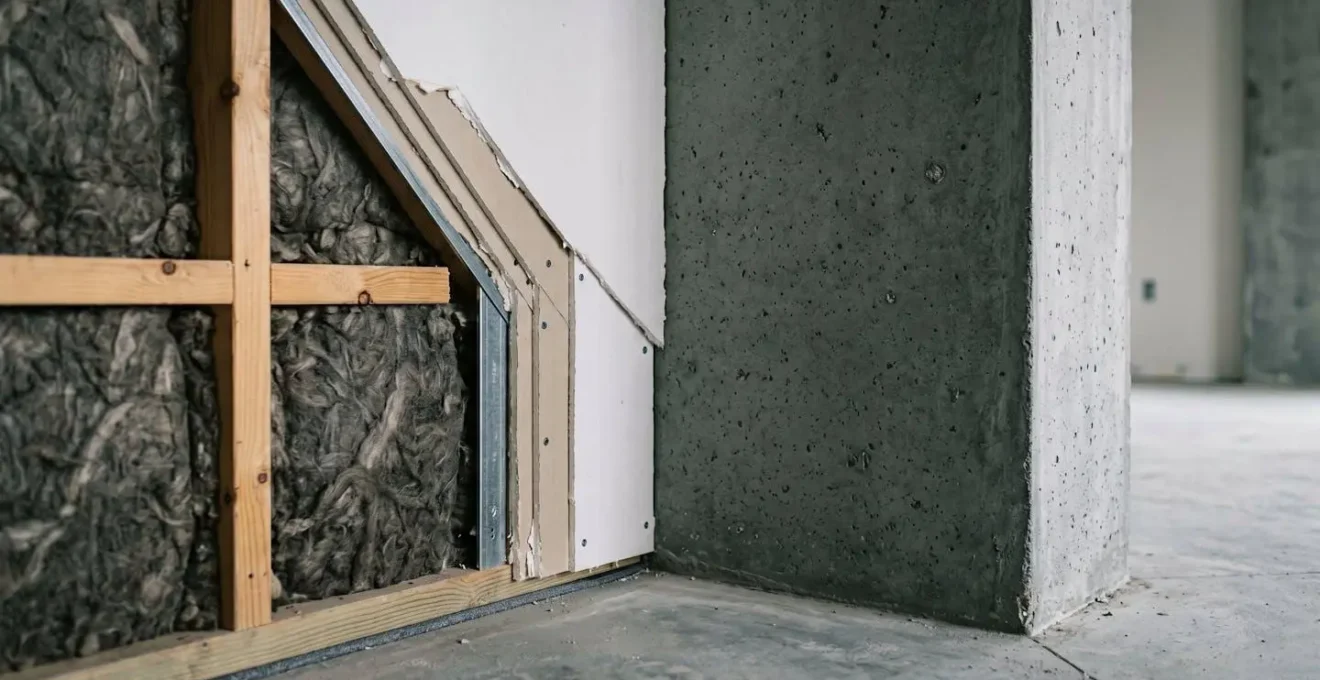
As the diagram illustrates, a direct connection between materials creates a bridge for sound. The solution to breaking this bridge is Decoupling. In construction, this is achieved with resilient channels or isolation clips, which create a flexible air gap between layers of drywall, forcing vibrations to die out. For a tenant, tearing down drywall is not an option. However, the principle of decoupling can be applied on a smaller, yet highly effective, scale.
Case Study: Micro-Decoupling for Apartment Creators
Practical micro-decoupling is essential for renters. The most common source of self-inflicted structure-borne noise comes from studio monitors and amplifiers placed directly on a desk or floor. By placing speakers on dedicated foam isolation pads, you physically decouple them from the surface. This simple act prevents the speaker’s vibrations from traveling into the desk, through the floor, and into the building’s structure, which not only makes you a better neighbor but also tightens your bass response by preventing the floor from resonating. For heavier sources like a drum kit or bass amp, larger isolation platforms perform the same function on a grander scale, effectively dampening vibration transfer without any structural modifications.
Glass or Plexiglass: How to Seal Windows Without Losing Light?
From a soundproofing perspective, a standard single-pane window is a giant hole in your wall. Glass is a relatively lightweight and rigid material that vibrates easily, offering minimal resistance to sound energy. Even high-quality, double-pane windows often have their effectiveness compromised by poor seals around the frame. Before considering expensive window replacements (which are not an option for renters), the most cost-effective first step is sealing every possible air leak. Adding acoustic seals around doors and windows is a simple DIY project that can cost less than $100 and yield significant improvements.
For those needing a more robust solution without permanently altering the window, the answer lies in building a removable acoustic window insert, sometimes called a window plug. The choice between glass and plexiglass (acrylic) for the insert’s clear panel depends on the goal. Laminated glass is superior for sound isolation due to its mass and damping properties, but it’s heavy and expensive. Acrylic is lighter and safer but less effective acoustically. For a DIY project, using multiple layers of acrylic or a combination of acrylic and a solid material like MDF creates a powerful Mass-Air-Mass system: the existing window (mass), a sealed air gap (air), and your plug (mass).
This system forces sound waves to lose energy with each transition, dramatically reducing noise levels. Building an effective plug requires precision and attention to creating a perfect seal.
Your Action Plan: Building a DIY Acoustic Window Insert
- Measure Precisely: Measure the window opening’s height, width, and depth. Check all four sides, as frames are rarely perfectly square, and use these precise measurements for your cuts.
- Cut the Frame: Cut MDF or a similar dense board to the exact dimensions of the window opening. Use a square tool to ensure perfectly straight lines and 90-degree angles for a tight fit.
- Create the Air Gap: The effectiveness of the Mass-Air-Mass system relies on the sealed air gap. Aim for a gap of at least 2 inches between the original windowpane and your plug to effectively trap sound waves, especially lower frequencies.
- Seal the Edges: Apply thick, compressible weatherstripping foam around the edges of the plug’s frame. This creates an airtight seal against the window jamb and provides friction to hold the plug securely in place.
- Add Handles & Test: Attach handles for easy installation and removal. Once complete, perform a light test. In a dark room during the day, hold the plug in place. If any light leaks through, sound will too. Re-seal any gaps until it is completely light-tight.
The Air Gap Error That Renders Your Soundproofing Useless
Think of sound energy like water. It is relentless, and it will exploit the smallest crack or opening to get through a barrier. This is the single most overlooked principle in DIY soundproofing. You can spend a fortune adding mass to a wall, but if there is even a tiny unsealed gap, a significant amount of sound will leak through, completely undermining your efforts. An acoustical rule of thumb states that a 1% air gap in a barrier can allow up to 50% of sound energy to pass through. This is why sealing air gaps is not a minor detail; it is the absolute foundation of any soundproofing project.
In a typical apartment, these flanking paths are everywhere: the gap under your front door, unsealed electrical outlets, HVAC vents, and gaps around pipes. For apartment complexes located near major noise sources like highways or airports, a focused effort on sealing these weak points is paramount. Professional assessments show that upgrading glazing and door seals can reduce exterior noise by up to 40%. This demonstrates that meticulous sealing provides a massive return on investment before you even consider adding more mass.
Conducting a thorough air leak audit is your first and most critical task. On a windy day, carefully move a lit incense stick around the perimeters of all windows, doors, and wall penetrations. Anywhere the smoke flickers or is drawn in is a sound leak that must be sealed. Use a high-quality, flexible acoustic sealant (not standard caulk) to fill these gaps, as it is designed to remain pliable and absorb vibrations. Pay special attention to electrical outlet and switch plate covers; removing them often reveals large, unsealed holes in the drywall that act as direct conduits for noise between apartments. Sealing these with acoustical putty pads is a simple, reversible, and highly effective fix.
Problem & Solution: Silencing Air Conditioning Rumble in the Booth
One of the most common and frustrating noise sources for anyone recording audio in an apartment is the HVAC system. The low-frequency rumble from an air conditioner or heater is a double-pronged attack: it creates airborne noise from the fan and airflow, and structure-borne noise as the unit’s vibrations travel through the floor and walls. Simply turning the unit off during recording is the easiest solution, but it’s often not practical during hot or cold weather. A more strategic approach is needed, based on a classic acoustical model: Source, Path, and Receiver.
The goal is to interrupt the noise at each stage of its journey. You must treat the source of the vibration, block the path it travels, and minimize its impact at the final receiver—your microphone. For an in-unit air conditioner, this means physically isolating the unit itself from the building structure. Even for central air systems where you can’t access the main unit, you can still treat the path (the vents) and the receiver (the microphone).
Case Study: A Source-Path-Receiver Strategy for AC Noise
To combat structure-borne vibrations from an in-unit air conditioning system, the first step is to treat the Source. Placing the entire AC unit on a heavy-duty vibration isolation pad or platform helps decouple it from the floor, significantly reducing the amount of vibrational energy that can travel into the building’s structure. For the Path, airborne noise traveling through ductwork can be mitigated by building a removable, baffled vent cover lined with acoustic foam. Finally, at the Receiver stage, microphone choice is critical. Instead of a highly sensitive condenser microphone that captures every nuance of the room, choosing a broadcast-style dynamic microphone like a Shure SM7B is a form of treatment. These mics are designed with excellent off-axis rejection, meaning they primarily capture what is directly in front of them and naturally reject ambient room noise like AC rumble.
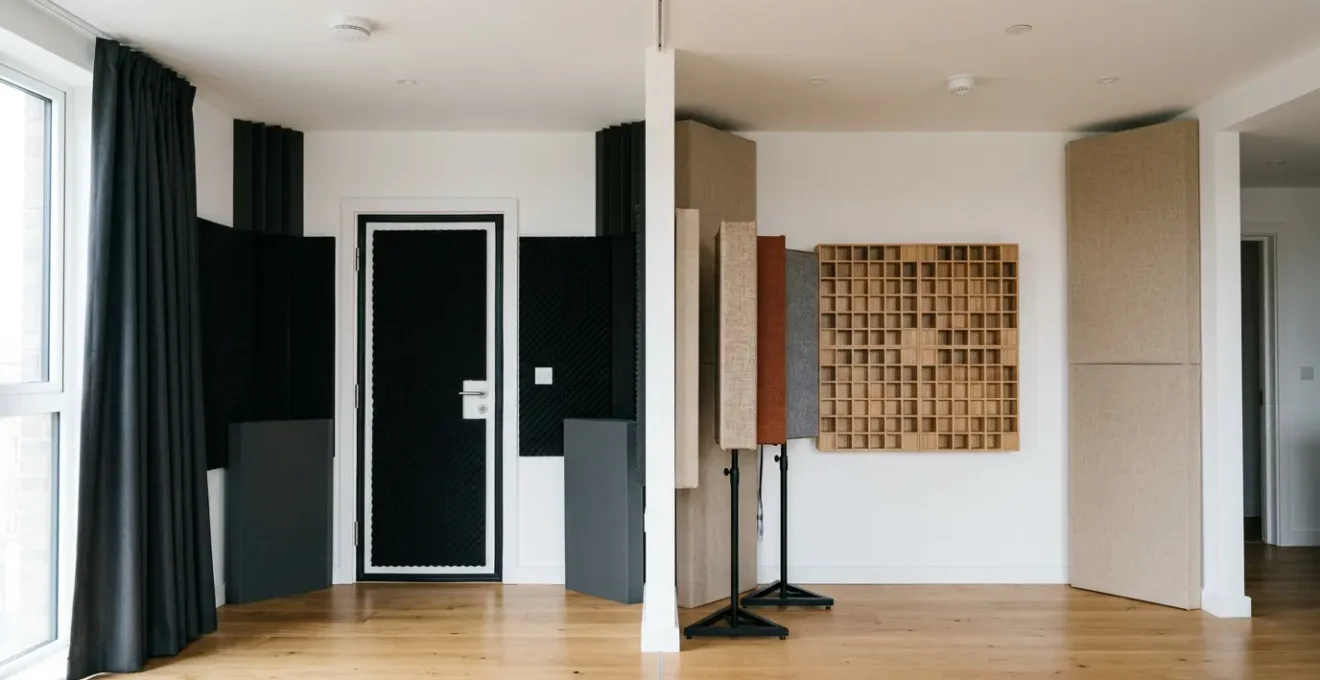
Egg Cartons vs Rockwool: The Acoustic Treatment Myth That Won’t Die
Now that we have established the principles of isolation, we shift our focus to controlling sound quality *within* a room. This is the domain of acoustic treatment, and it is where the most persistent and useless myth resides: the idea that egg cartons or thin foam are effective acoustic tools. This misconception stems from a fundamental confusion between soundproofing and sound absorption. Egg cartons are made of a light, rigid, and non-porous material. They lack the mass to block sound (soundproofing) and the properties to absorb it (treatment). At best, their shape provides a tiny amount of high-frequency diffusion, but their overall effect on a room’s acoustics is negligible.
Effective sound absorption relies on a different physical principle: converting sound energy into heat. This is achieved using soft, porous, and dense materials like fiberglass, mineral wool (Rockwool), or high-density acoustic foam. When sound waves enter these materials, they get trapped in the intricate web of fibers, causing friction and converting the sound energy into a minuscule amount of heat. The effectiveness of a material at absorbing sound is measured by its Noise Reduction Coefficient (NRC), a rating from 0 to 1 (or higher). An NRC of 0 means no sound is absorbed (like concrete), while an NRC of 1.0 means 100% of the sound that strikes the material is absorbed.
As this comparative analysis from Acoustic Design Works demonstrates, the difference between DIY myths and professional materials is not subtle.
| Material | NRC Rating | Percentage of Sound Absorbed | Effectiveness |
|---|---|---|---|
| Egg Cartons | ~0.15 | 15% | Poor – mostly reflects sound |
| Moving Blankets | ~0.40 | 40% | Moderate – basic noise reduction |
| 2-inch Studio Foam | ~0.65 | 65% | Good – effective for mid-high frequencies |
| 1-inch Acoustic Panels (Fiberglass) | 0.85 | 85% | Excellent – professional-grade absorption |
| 4-inch Rockwool Panels | ~1.05 | 100%+ | Superior – broadband absorption including bass |
The data is unequivocal. As the experts at Acoustic Design Works note in their research, real acoustic panels are engineered for performance. They explain:
2-inch acoustic panels from Acoustic Design Works, with a fiberglass core and sound transparent fabric covering, have an NRC rating of 1.0, meaning they absorb all of the sound waves that strike them.
– Acoustic Design Works, What Does The NRC Rating Of An Acoustic Panel Mean?
Problem & Solution: Achieving Pro Quality in an Untreated Bedroom
Knowing you need high-NRC materials is one thing; knowing where to put them in a small, untreated bedroom is another. A common mistake is to randomly place foam squares on walls, which is inefficient and ineffective. The key to treating a small room on a budget is to apply the 80/20 rule: focus 80% of your effort and budget on the 20% of locations that cause the most acoustic problems. In any rectangular room, there are two primary problem areas: the corners and the first reflection points.
Corners are where low-frequency sound waves (bass) accumulate and build up, creating « room modes » that result in a boomy, inaccurate bass response. This is why bass traps are the single most important treatment for any small room. The second problem area is the Reflection Free Zone (RFZ) around your listening position. Sound from your speakers doesn’t just travel directly to your ears; it also bounces off the side walls, ceiling, and desk before arriving, slightly delayed. These reflections smear the stereo image and obscure detail. Placing absorption panels at these first reflection points is critical for achieving clarity.
For a tenant in a bedroom studio, this targeted approach delivers professional results without covering every surface:
- Priority 1: Bass Traps. Build or buy the thickest, densest DIY bass traps you can and place them in the front corners of your room, from floor to ceiling if possible. This is where low frequencies naturally accumulate, and taming them is your first priority.
- Priority 2: Reflection Free Zone (RFZ). Create an RFZ at your mix position by placing absorbers on stands or with temporary adhesive at your first reflection points. An easy way to find these is the « mirror trick »: have a friend slide a mirror along the side walls while you sit in your listening position. Anywhere you can see a speaker in the mirror is a first reflection point that needs a panel.
- Vocal Recording Zone: For recording vocals, create a 360-degree isolation zone. Use a reflection filter in front of the microphone and place a heavy moving blanket on a C-stand behind the singer to absorb reflections from the rear.
- Microphone as Treatment: In a highly untreated space, choose a broadcast-style dynamic microphone (like a Rode Procaster or Shure SM7B) over a sensitive condenser mic. Its natural rejection of off-axis sound acts as a form of acoustic treatment in itself.
Key Takeaways
- Soundproofing stops sound transfer between spaces using Mass and Decoupling (Isolation). It’s a structural problem.
- Acoustic Treatment controls sound reflections within a single room using Absorption and Diffusion (Quality). It’s an interior acoustics problem.
- For apartment dwellers, addressing flanking paths (structural vibration) and air gaps is often more critical and cost-effective than treating a single wall.
Why Your Mixes Translate Poorly Even With Expensive Monitors?
This is the ultimate question for any home studio creator. You’ve invested in high-quality studio monitors, yet when you play your mix in a car, on a laptop, or through earbuds, it falls apart. The bass disappears, the vocals get buried, or the entire mix sounds harsh. The culprit is almost never the speakers themselves; it’s the room they’re in. Your expensive monitors are providing an accurate sound, but your untreated room is lying to you. Acoustic issues like room modes, flutter echo, and comb filtering are coloring the sound that reaches your ears, forcing you to make poor mixing decisions to compensate for problems that don’t actually exist in your audio file.
For example, if your listening position is in a spot where a bass frequency is being cancelled out by reflections (a « null »), you will artificially boost that frequency in your mix to make it sound right *to you*. When that mix is played on any other system, that frequency will be overwhelmingly loud. This is why your mixes don’t « translate. » The solution is a hybrid approach that combines physical treatment with digital correction and, most importantly, a reliable referencing workflow.
Case Study: The Hybrid Acoustics Approach for Renters
Modern solutions for apartment studios recognize that perfect physical treatment is often impossible. The most practical solution for renters is a hybrid model. First, strategically place sound absorbers to reduce reverberation and treat the most critical first reflection points—this can reduce overall reverb by up to 90 percent without structural changes. Then, use digital room correction software (like Sonarworks SoundID Reference or IK Multimedia’s ARC System) with a measurement microphone. This software analyzes your room’s specific frequency response at the listening position and creates a corrective EQ curve that flattens the response, giving you a more accurate sound without needing to perfectly treat every surface.
Finally, no matter how good your room is, you must verify your mixes on other systems. This requires a disciplined, multi-stage referencing process.
- A/B in the Studio: Constantly A/B your mix against well-mastered commercial tracks in your genre, ensuring they are played back at the same calibrated volume (typically 79-85 dB SPL).
- Virtual Referencing: Use headphone simulation software like dSONIQ Realphones or Waves Nx to check your mix in a variety of virtual, professionally treated studio environments.
- Consumer Device Gauntlet: Before publishing, test the final mix on a wide range of common consumer playback devices: AirPods, a car stereo, laptop speakers, and a smartphone. Listen for what gets lost or what jumps out on each system.
By adopting this diagnostic, structural mindset, you can finally stop fighting your room and start making informed decisions. Whether your goal is a peaceful living space or a professional-sounding mix, understanding the physics of sound is the first and most important step. Begin by auditing your own space to determine if your primary challenge is isolation or clarity, and then apply the targeted principles discussed here to achieve real, measurable results.