In summary:
- Upgrading a budget guitar is less about buying expensive parts and more about systematically eliminating performance bottlenecks.
- Focus first on « free » upgrades: proper setup, pickup height adjustment, and diagnosing tuning issues at the nut, not the bridge.
- Key electronic upgrades like star grounding and a treble bleed circuit fix common noise and tone loss issues for minimal cost.
- Playability improvements, like dressing sharp fret ends, are often simple DIY jobs that dramatically improve the feel of the instrument.
- Your amplifier and signal chain are as crucial as the guitar; learn to shape your tone with less gain and the right volume solutions.
That budget Squier or Epiphone in the corner has potential. You know it, but every time you plug it in, something feels off. The tone is a bit lifeless, it won’t stay in tune through a single song, and a persistent buzz hums in the background. The internet’s conventional wisdom is a chorus of « buy new pickups, » « get locking tuners, » and « replace everything. » This advice often leads to a cycle of expensive purchases that don’t fix the underlying issues, leaving you with a slightly more expensive budget guitar that still doesn’t feel right.
This approach is flawed because it treats the symptoms, not the disease. A professional luthier doesn’t just throw parts at a problem; they diagnose it. The real secret to transforming a budget instrument isn’t in the brand names on the components, but in understanding the complete system—from the string’s vibration to the speaker’s movement. It’s about identifying the specific, individual bottlenecks in your guitar’s mechanical stability and signal integrity and addressing them with precision.
But what if the most impactful upgrades weren’t the most expensive ones? What if the key to professional tone and stability was a series of small, methodical adjustments and targeted, affordable component choices? This guide will walk you through the luthier’s mindset. We will move beyond the platitudes and dive into the physics of why your guitar behaves the way it does. We’ll explore how to diagnose issues correctly, how to make adjustments that cost nothing but your time, and when to spend money on upgrades that provide a genuine, measurable return on investment.
This article provides a structured approach to identifying and solving the most common issues that hold back budget guitars. Follow these sections to methodically turn your instrument into one that inspires you to play.
Summary: A Luthier’s Path to Pro-Level Guitar Upgrades
- Why the Wood Species Matters Less Than Your Pickup Height?
- How to Choose the Right Pickups to Balance Output and Clarity?
- Hardtail or Tremolo: Which Bridge Offers Better Tuning Stability for Beginners?
- The Wiring Mistake That Creates Constant Buzzing in Your Signal
- Problem & Solution: Smoothing Sharp Fret Ends in Winter
- Why Turning Down the Master Volume Kills Your Tone (And How to Fix It)?
- Why Using Less Gain Actually Makes Your Guitars Sound Heavier?
- How to Get Saturated Tube Tone at Bedroom Volumes Without Eviction?
Why the Wood Species Matters Less Than Your Pickup Height?
The « tonewood » debate is one of the most persistent myths in the electric guitar world. While the type of wood undoubtedly shapes the voice of an acoustic instrument, its role in a solid-body electric guitar is far more subtle than most players believe. The pickups, being electromagnetic sensors, don’t « hear » the wood’s acoustic properties. Instead, they read the disturbance in the magnetic field caused by the vibrating metal strings. The wood’s primary influence is on sustain and the mechanical feedback loop between the strings and the body, but these effects are often secondary to the electronic components.
In fact, wood-induced differences in amplified tone are measurable but subtle, with the pickups and electronics dominating the overall frequency response. A controlled experiment from the UBC Physics Department demonstrated this by measuring a guitar’s output with and without foam damping the body. While the graphs showed that body resonance affected specific frequencies, it confirmed the effect occurs through string-structure coupling, not acoustic projection. The takeaway is clear: before you worry about whether your guitar is made of alder or mahogany, focus on what you can control.
The single most powerful—and free—tone-shaping tool at your disposal is pickup height. A small adjustment of a millimeter can drastically alter your guitar’s character. Raising a pickup closer to the strings increases output and midrange punch, but get too close, and the magnetic pull can dampen string vibration, reducing sustain and creating dissonant overtones. Lowering the pickup increases clarity, dynamic range, and sustain, but reduces output. The sweet spot is a matter of taste, but finding it is the first and most critical step in defining your guitar’s core voice, long before you consider swapping any parts.
How to Choose the Right Pickups to Balance Output and Clarity?
Once you’ve optimized your existing pickups, a replacement can be the most transformative upgrade. However, navigating the market is confusing. The key is to ignore marketing hype and focus on the core specifications that define a pickup’s performance: magnet type, DC resistance, and how these elements interact with your amplifier.
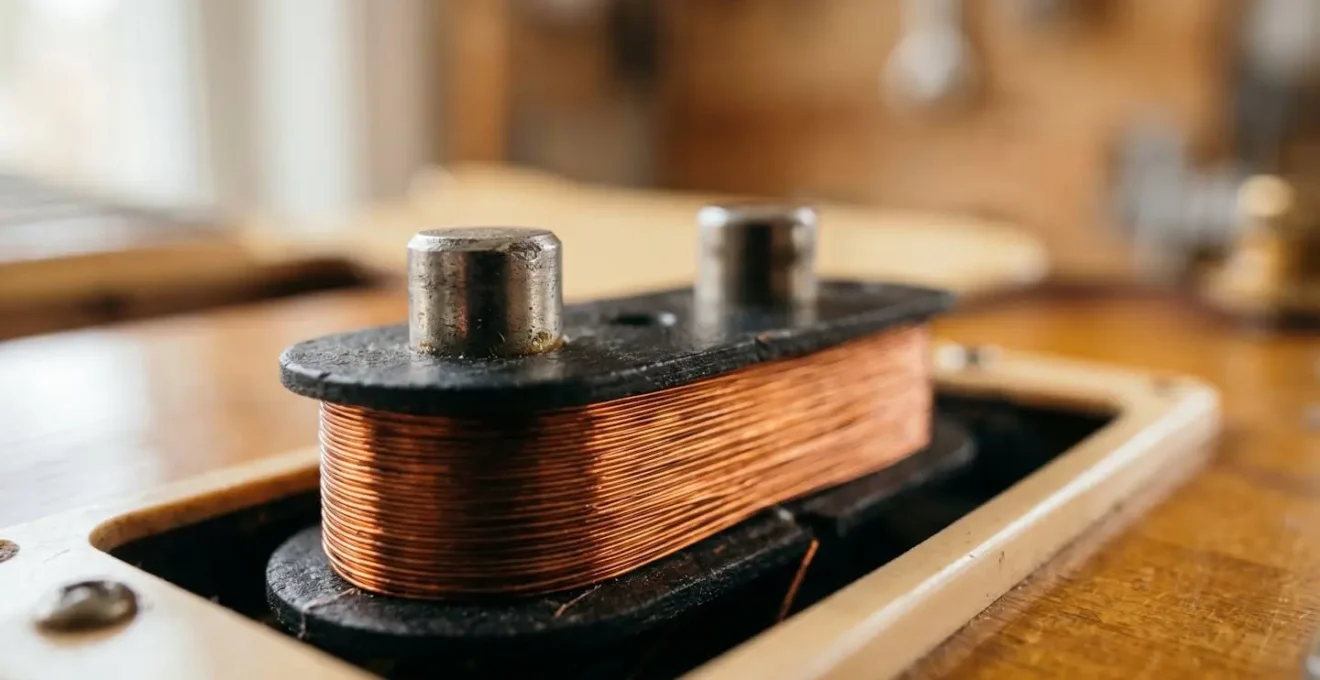
The magnet is the heart of the pickup. Different materials and strengths create wildly different tonal palettes. Alnico magnets (alloys of aluminum, nickel, and cobalt) are known for their warm, vintage character, while ceramic magnets provide a more aggressive, high-output voice with a sharper attack. The illustration below highlights the core components, showing how the magnets and coil windings work together to create the pickup’s unique voice.
Understanding these components is the first step toward making an informed choice. DC resistance, measured in Ohms (kΩ), is a rough indicator of output—higher resistance generally means more wire in the coil, leading to higher output and more midrange focus, but often at the expense of high-end clarity. Balancing this trade-off is crucial. A high-output pickup might sound powerful on its own but can turn to mud in a full band mix, whereas a lower-output pickup retains the articulation needed to cut through.
- Identify the magnet type: Alnico II offers a warm, vintage feel with a soft top end, perfect for blues and classic rock. Alnico V is brighter and punchier, with a tighter bass response ideal for modern rock. Ceramic magnets deliver a powerful, aggressive tone with sharp highs, suited for high-gain metal and punk.
- Check DC resistance: Low-output (5-7kΩ) pickups offer maximum clarity and dynamics. Medium-output (8-12kΩ) provides a balance of power and articulation for versatility. High-output (13kΩ+) delivers aggressive saturation and compression, ideal for driving an amp hard.
- Match pickup to amp: Don’t fight your gear. Pair bright-sounding pickups (like single-coils) with darker, British-voiced amps. Use warmer humbuckers to tame the top end of a bright, American-style amplifier.
- Consider budget alternatives: Brands like Artec, Wilkinson, and GFS produce excellent pickups that often rival the performance of boutique brands at a fraction of the cost.
Hardtail or Tremolo: Which Bridge Offers Better Tuning Stability for Beginners?
For a beginner, nothing is more frustrating than a guitar that won’t stay in tune. The bridge is often blamed, especially if it’s a floating tremolo system. While a hardtail bridge (where strings anchor directly to the body) is inherently more stable due to having no moving parts, the truth is that 95% of tuning problems originate at the nut, not the bridge. Before considering a costly bridge replacement, a luthier always follows a diagnostic process called the « Hierarchy of Friction. »
Friction is the enemy of tuning stability. When you bend a string or use a tremolo, the string slides through the nut slot and over the string tree. If there’s too much friction at these points, the string can’t return to its original position, causing it to go sharp or flat. The solution is rarely a new bridge; it’s systematically finding and eliminating these friction points.
Before you blame your tremolo, run through this diagnostic checklist:
- Inspect the nut: Are the slots pinched or grabbing the strings? A simple application of graphite (from a pencil tip) can solve many issues. If the slots are cut incorrectly, a properly filed or self-lubricating GraphTech nut is a far more effective upgrade than a new bridge.
- Evaluate string trees: These small metal guides create a proper break angle over the nut but can be a major friction point. Ensure they are lubricated.
- Assess your winding technique: Too many or too few wraps around the tuning post can cause slippage. Aim for 2-3 clean wraps.
- Deck the tremolo: If you don’t use the whammy bar, you can achieve hardtail-like stability by tightening the spring claw screws in the back cavity until the bridge rests flush against the body. This is a free, reversible mod.
Once all other friction points are addressed, you can make an informed decision about bridge type. For a beginner focused on learning technique, a hardtail is the clear winner for its simplicity and rock-solid stability. This table breaks down the key differences:
| Characteristic | Hardtail Bridge | Tremolo Bridge |
|---|---|---|
| Tuning Stability | Maximum stability; string-through design prevents movement | Requires balancing act between string tension and springs; less stable |
| Setup Complexity | Minimal maintenance; set and forget approach | Complex setup requiring spring tension adjustment and regular maintenance |
| Sustain Transfer | Enhanced sustain through direct body coupling | Slight energy loss through moving parts |
| String Tension Feel | Higher perceived tension from increased break angle | Slinkier, more flexible feel with lower string angle |
| Best for Beginners | Yes – allows focus on technique without setup frustration | No – requires experience and proper tools for setup |
| Professional Setup Cost | $50-100 | $80-150 |
The Wiring Mistake That Creates Constant Buzzing in Your Signal
That infuriating 60-cycle hum or radio interference you hear isn’t a sign of « bad pickups »—it’s a problem with your guitar’s grounding and shielding. Budget guitars often suffer from poor wiring practices that create « ground loops, » which act like antennas for electromagnetic interference (EMI). The most common mistake is a « daisy-chain » ground, where components are wired to each other in a series before finally connecting to the output jack. This creates multiple paths to ground, inviting noise into your signal.
The professional solution is a technique called star grounding. This involves creating a single, central point in the control cavity where every ground wire converges. Wires from the pickups, potentiometers, switch, and bridge all run directly to this single point, eliminating the potential for loops. This ensures a clean, quiet signal path by providing only one route for unwanted electrical noise to exit the circuit.
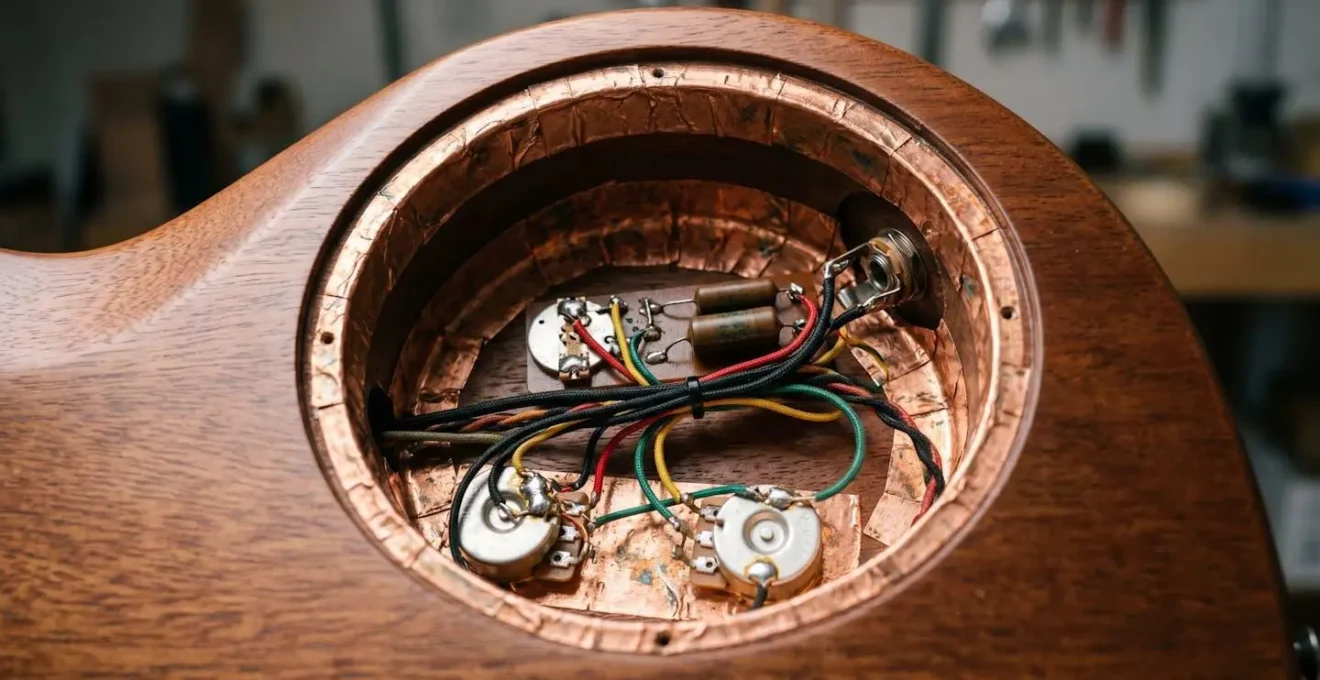
Complementary to proper grounding is shielding. Your guitar’s control cavity is an open box that’s highly susceptible to EMI from lights, amps, and even your phone. Lining the cavity with conductive copper or aluminum tape creates a Faraday cage, an enclosure that blocks external electrical fields from interfering with your sensitive electronic components. The image below shows a properly shielded cavity, forming a protective barrier for the electronics within.
Implementing a star grounding scheme is a straightforward soldering job that can make a night-and-day difference in your guitar’s noise floor.
- Establish a star point: Solder a single wire to the back of your volume pot or use a dedicated lug. This is your central ground.
- Route pickup grounds: Run the ground wires from each pickup directly to the star point.
- Connect pot grounds: Run a separate wire from the casing of each additional pot to the star point. Do not connect them to each other.
- Ground the output jack: Run a wire from the jack’s ground (sleeve) terminal directly to the star point.
- Connect the bridge ground: The wire coming from your bridge or tremolo claw also connects directly to this central point.
Problem & Solution: Smoothing Sharp Fret Ends in Winter
As winter arrives and indoor heating dries the air, you may notice the edges of your fretboard feel sharp and uncomfortable. This phenomenon, known as « fret sprout, » occurs because the wood of your neck shrinks as it loses moisture, while the metal frets do not. This causes the fret ends to protrude from the sides of the fingerboard, making the guitar unpleasant to play.
This isn’t a sign of a poorly made neck; it’s a natural reaction of wood to environmental changes. In fact, research shows that moisture content in wood has a dramatic impact on its physical dimensions and damping behavior. While a humidifier can help prevent the issue, addressing existing fret sprout is a simple and highly rewarding DIY repair that will make your budget guitar feel like a premium, hand-finished instrument.
With a few simple tools—a specialized fret-end file, masking tape, and fine-grit sandpaper—you can achieve a smooth, comfortable neck in under 30 minutes. The key is to work slowly and methodically, protecting the wood while precisely filing the metal fret ends.
Your Action Plan: The Luthier’s Fret End Dressing Procedure
- Protect the Fretboard: Apply painter’s tape along the edge of the fretboard, right up to the fret ends. This prevents the file from scratching the wood or finish.
- File at the Correct Angle: Hold a fret-end dressing file at a consistent 30-45 degree angle to the neck. Use smooth, controlled downward strokes, removing only the protruding metal.
- Work Systematically: Move from the first fret to the last, applying gentle, even pressure on each fret end to create a uniform bevel across the entire neck.
- Smooth and Polish: After filing, wrap a small piece of 400-grit sandpaper around the file or a small, hard block. Lightly polish each fret end to remove any file marks and create a perfectly smooth surface.
- Roll the Fingerboard Edges: For a true custom-shop feel, use 400-grit sandpaper to gently soften the sharp 90-degree corner where the fretboard meets the neck. A few light passes are all it takes to create a comfortable, « played-in » feel.
Why Turning Down the Master Volume Kills Your Tone (And How to Fix It)?
Have you ever noticed that as you roll back the volume knob on your guitar, your tone gets dark and muddy? This isn’t your imagination; it’s a fundamental electrical phenomenon. Your pickups, volume pot, and guitar cable create a simple low-pass filter. As you turn the volume down, the resistance of the potentiometer interacts with the capacitance of your cable, progressively cutting high frequencies.
According to an explanation of capacitive loading, this interaction creates a frequency-dependent impedance that attenuates treble more than bass, which is why the guitar sounds dull at lower volume settings. The longer your cable, the more capacitance it has, and the more pronounced this treble loss becomes. Fortunately, there’s a simple, inexpensive fix: the treble bleed circuit. This is a small capacitor (and sometimes a resistor) soldered across the input and output lugs of your volume pot. It allows high frequencies to « bleed » past the potentiometer as you turn it down, preserving your guitar’s top-end sparkle and clarity at any volume level.
There are several types of treble bleed circuits, each with a slightly different feel and tonal response. Choosing the right one depends on your guitar and personal preference. This table compares the three most common configurations:
| Circuit Type | Components | Tonal Effect | Volume Taper Feel | Best Application |
|---|---|---|---|---|
| Capacitor Only | Single 1000-2200pF cap | Preserves highs but can sound thin at mid-volume positions | More abrupt volume drop | Bright single-coils; players who use full volume or zero |
| Parallel Cap + Resistor | 1000pF cap + 150k-330k resistor in parallel | Balanced treble retention with natural mid-volume tone | Smooth, musical taper throughout range | Most versatile; works with humbuckers and single-coils |
| Series Cap + Resistor | 1000pF cap in series with 220k-470k resistor | Subtle treble preservation; maintains warmth | Most gradual, linear volume response | Dark-sounding guitars; jazz and blues players |
Why Using Less Gain Actually Makes Your Guitars Sound Heavier?
In the quest for a heavy guitar tone, the instinctive reaction is to crank the gain knob on the amplifier. Counter-intuitively, this is often the fastest way to a thin, fizzy, and powerless sound. True sonic weight comes from clarity and low-end definition, both of which are destroyed by excessive distortion. This happens because of a phenomenon called frequency masking.
When you add extreme amounts of gain, the amplifier intensely compresses the signal and generates a massive amount of harmonic overtones. These overtones all compete for space in the crowded midrange frequencies. As a result, the powerful fundamental notes and the punchy low-end of your playing get buried or « masked » by a wall of indistinct midrange fuzz. The perceived result is a tone that lacks weight and punch, because the very frequencies that provide heaviness are no longer audible. Your guitar sounds small and angry, not big and heavy.
The professional solution is to use less amplifier gain and tighten the signal *before* it hits the amp. This is famously achieved by using an overdrive pedal not as a distortion source, but as a filter and a clean boost. By setting the pedal’s drive to zero and its level to maximum, you slam the front end of your amp with a strong, clean signal that has been EQ-shaped by the pedal’s circuit. Most classic overdrive pedals naturally cut some sub-bass frequencies and boost the mids, which tightens up the low-end and adds attack and definition before the amp’s gain stage even begins to work. This allows you to get a saturated, heavy tone with the amp’s gain set much lower, preserving the clarity and punch that was previously lost to frequency masking.
Follow this modern metal technique to achieve a tight, percussive, and heavy rhythm tone:
- Select a transparent overdrive pedal: Choose a pedal known for its tight low-end, like a Tube Screamer-style circuit.
- Set the Drive control to zero: You want the pedal to act as a filter, not an extra gain stage.
- Maximize the Level control: This boosts the signal, driving the amp’s preamp tubes harder for natural saturation.
- Place the pedal first: The pedal should go between your guitar and the amp’s input.
- Set amp gain to taste: With the pedal on, you’ll find you need much less amp gain for a tone that is both heavier and more articulate, especially for palm-muted riffs.
Key takeaways
- The most impactful upgrades often address playability and electronics (setup, fretwork, grounding) rather than expensive cosmetic changes.
- Diagnosing the root cause of a problem (e.g., friction at the nut for tuning) is more effective than simply replacing the most obvious part (e.g., the bridge).
- Your guitar is part of a system; its tone is shaped equally by pickups, electronics, the amplifier, and even the efficiency of your speaker.
How to Get Saturated Tube Tone at Bedroom Volumes Without Eviction?
The ultimate goal for many guitarists is the rich, complex saturation of a tube amplifier pushed to its breaking point. The problem? Achieving that tone often requires window-shattering volume. This classic dilemma has several modern solutions, each with its own set of trade-offs in terms of cost, convenience, and tonal authenticity. The right choice depends entirely on your specific needs as a player.
The main solutions involve either managing the power your amp produces or generating the tone differently. A power attenuator sits between your amp’s output and the speaker, absorbing most of the power and converting it to heat, letting you crank the amp while sending only a fraction of the volume to the speaker. This is often considered the most authentic way to preserve true power-tube saturation. Alternatively, many modern amps feature a good master volume, which allows you to saturate the preamp section at low volumes, though this produces a different character of distortion than power-tube saturation. For recording-focused players, re-amping or using Impulse Responses (IRs) offers limitless flexibility by capturing a dry signal and processing it later.
However, there is another, often-overlooked solution: changing your speaker. A speaker’s efficiency rating (measured in dB) determines how much volume it produces for a given amount of power. As demonstrated by speaker efficiency measurements, swapping from a 100dB speaker to a less efficient 95dB speaker can cut the perceived volume in half without changing your amp’s settings or tone at all. This can be a highly effective way to get your amp into its sweet spot at a more manageable volume. This decision matrix can help guide your choice:
| Solution | How It Works | Tonal Impact | Best For | Typical Cost |
|---|---|---|---|---|
| Power Attenuator | Absorbs power between amp output and speaker; maintains power tube saturation at lower volume | Preserves authentic power amp compression and harmonics | Vintage non-master amps (Plexi, tweed Deluxe); players needing genuine cranked-amp tone | $150-500 |
| Master Volume Amp | Separate preamp gain and output volume controls; saturates preamp without driving power tubes | Different character than power tube saturation; more preamp-focused distortion | Modern channel-switching amps; players comfortable with preamp-generated distortion | Built-in feature |
| Re-amping/IR | Record dry signal, process through amp simulator or real amp later, or use impulse responses | Unlimited tonal flexibility; captures professional studio techniques | Recording-focused players; those wanting maximum flexibility without neighbor complaints | $50-300 for interface and software |
By applying this luthier’s mindset—diagnosing before replacing, focusing on the entire signal chain, and understanding the « why » behind each adjustment—you can elevate any budget guitar into a truly professional, high-performance instrument that you’ll never want to put down.